Catchfire Hosting 101
Welcome to Pantheon
Once you sign on for our hosting service, we’ll send you your Pantheon login information. A key reason we chose Pantheon as our hosting provider is the dashboard. With the dashboard, you have a personalized, unique view of your website. Whether you want a quick snapshot of your site’s performance or more in-depth reporting for the advanced user, the dashboard has it all. Here are some of the things you can access from your Pantheon account:
- Access to site hosting dashboard
- Contains reports & logs
- Access to dev site to add plugins and other site code content
- SFTP access available
- Ability to deploy code changes available, ask for more info
- Free New Relic subscription
- Provides site performance monitoring/analytics and site usage statistics
- Access to site database(s)
- Update, Export, Import permissions
- Ability to create/restore backups of site
- Can create backups in addition to automatic backups
- Advanced access and options available at request
Your Website is a Delicate Flower
One of the major benefits to using WordPress as a Content Management System is the vast ecosystem of plugins. Plugins can help to transform your site into a tailored experience for your users, your business, and for your management.
However, it’s important to remember that not all plugins are created equal. In fact, many plugins are poorly coded and may not interact well with other plugins on your site, or with your site theme in general. Installing a plugin directly onto your production website runs the risk of causing downtime due to errors. Likewise, updating plugins on a production site runs the same risk as plugin authors may introduce breaking changes to their code, or changes that are incompatible with your WordPress theme. In order to avoid these frustrating scenarios, sites hosted with Catchfire’s hosting platform have their ability to install plugins in the production environment disabled.
If you do decide to add a plugin to your site, there is a process you can follow to make that happen. However, the first step in this process is to ask yourself “Do I really need this plugin?“
Identify if adding the plugin:
- Will benefit your website visitors
- Will make your life easier as a site administrator/editor
- Has been updated to work with your version of WordPress
- Has good reviews and no red flag reviews regarding functionality issues
If you determine that adding the plugin is indeed a necessity and it passes muster, you may add the plugin utilizing the workflow below:
Adding a WordPress Plugin (Not for the Faint of Heart)
Your hosting plan consists of three versions of your site. A development site where changes are made, a testing site where changes are tested with the same data as your live site, and your live site, which is your publicly available site.
The ability to write files to your live website are limited in order to promote security and reliability of your site. Because of this you will need to install the plugin on your development site, test how the plugin behaves on your testing site, and finally push the plugin to your live site.
This workflow does take a few extra minutes to execute, but by checking your plugin’s functionality and compatibility with your site before activating it on your live site you are ensuring you do not experience downtime or unexpected errors.
Follow the process below to add a WordPress plugin to your site:
1.) Login to the platform here and select your site
2.) From your dashboard, make sure the ‘Dev’ tab is selected and select ‘Code’ from the left-hand menu
3.) Set your site to SFTP mode by clicking the ‘SFTP’ button
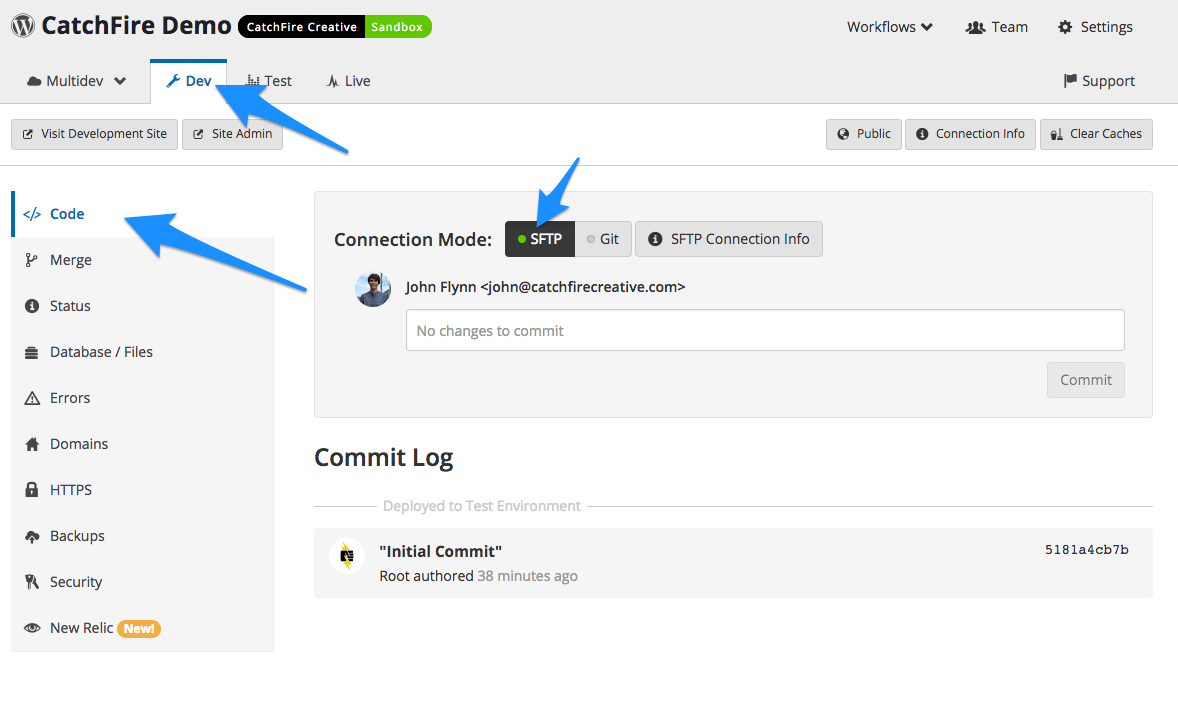 4.) Now visit your site by clicking the ‘Site Admin’ link and install the plugin. You do not need to activate the plugin at this stage
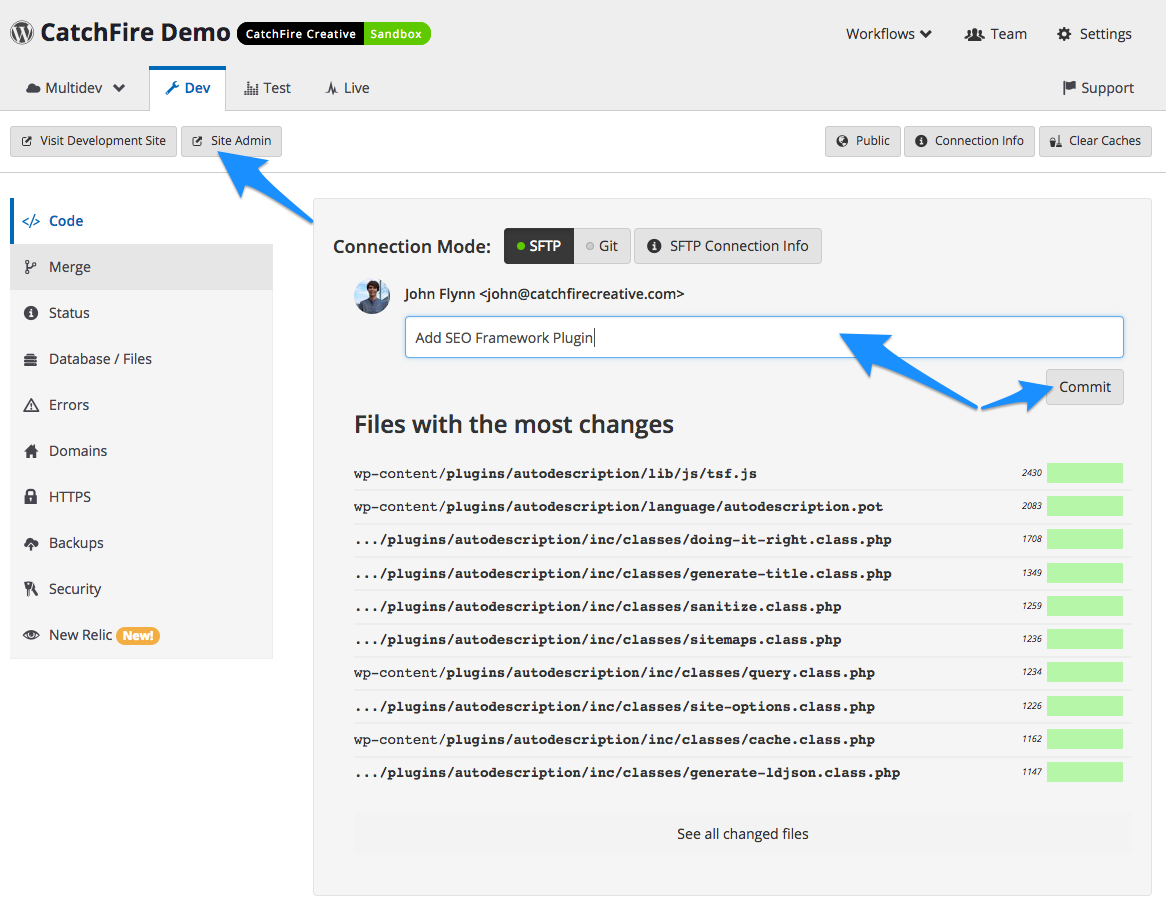
5.) After the plugin is installed, return to your site dashboard and enter in a description of what you installed into the ‘Commit Message’ box and click commit.
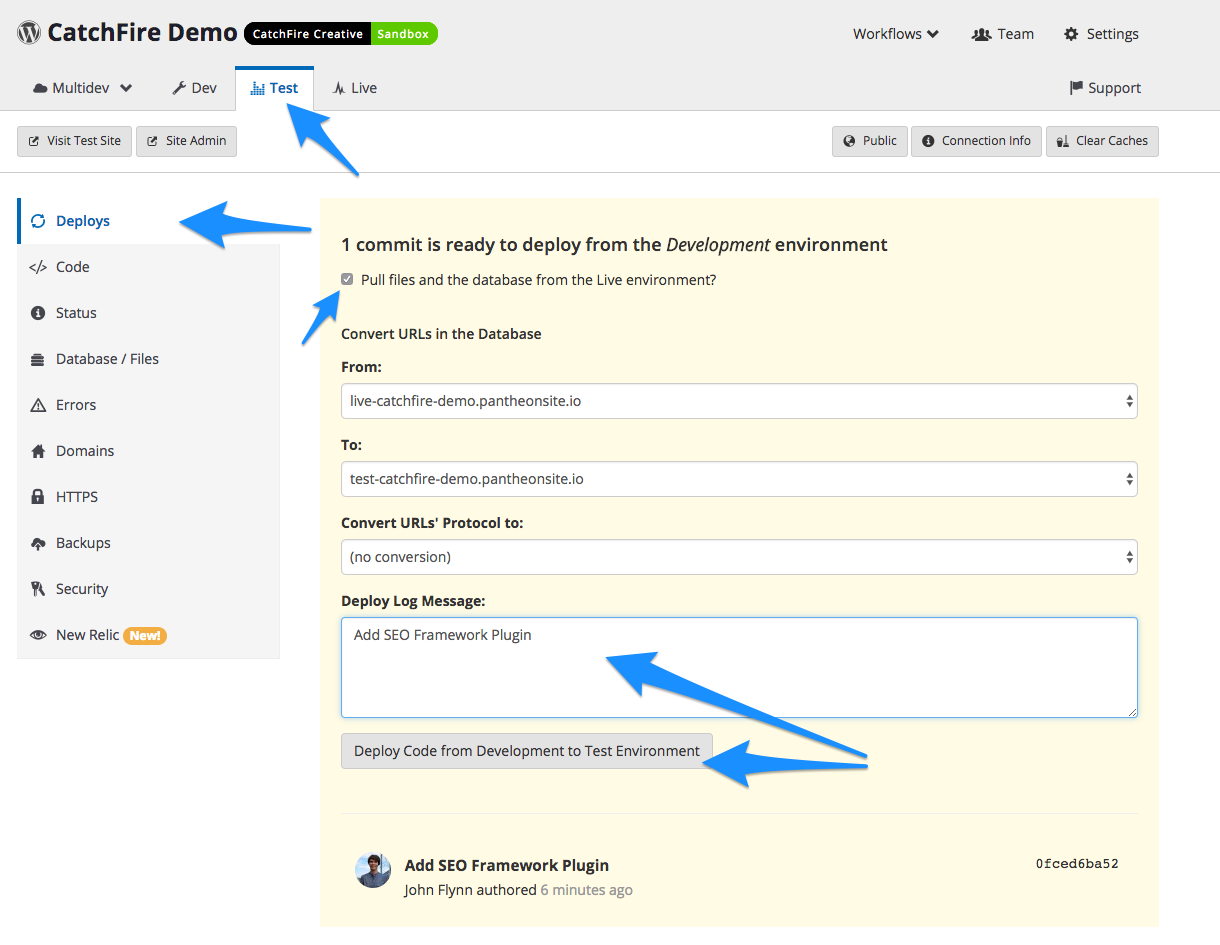
6.) Now that you have installed the plugin, it is time to test it on your testing site. Click the ‘Test’ tab from your site dashboard and select ‘Deploy’ from the left-hand menu
7.) Enter in a description of what you are adding into the Deploy Message box, check the box for ‘Pull files and the database from the Live environment?’, and click the ‘Deploy Code’ button
a.) By pulling in your files (uploads) and database from your live site, you are creating a duplicate testing environment. By testing your plugin here, you will know exactly how it will behave on your live site.
8.) Visit your test site by clicking the ‘Site Admin’ button. Activate, configure, and test your plugin on your test site. Ensure there are no errors or unexpected behavior
9.) Finally, click on the ‘Live’ tab, enter a description of what you’re adding into the Deploy Message box, and click the ‘Deploy Code’ button
10.) You can now login to your live site to activate and configure the plugin